目录
Audio GenerationWaveNetMain featuresNetworkImplementationAppendixText to Speechtext analysis文本分析文本规范化 (Text normalization )语音分析 (Phonetic analysis)韵律分析 (Prosody analysis)Waveform synthesis声波生成Reference
Audio Generation
WaveNet
Main features
μ-law companding transformation
- Quantizing 16-bit integer (65536 possible values) to 256 possible values,
- This non-linear quantization produces a significantly better reconstruction than a simple linear quantization scheme.
- For speech, we found that the reconstructed signal after quantization sounded very similar to the original.
- Preprocess dataset, downsampling from 16-bits to 8-bits
- For each time-step, final softmax outputs 256 values, regression problem like GPT
- Quantizing 16-bit integer (65536 possible values) to 256 possible values,
Gated activation units
- Output:
- In initial experiments, it is observed that this non-linearity worked significantly better than the rectified linear activation function for modeling audio signals
- Output:
Conditional wavenet
global conditioning
- Condition eg.: a single latent representation h
- Output:
local conditioning
- Condition eg.: a second timeseries h_t, a lower sampling frequency than the audio signal
- Output:
Complementary approach to increase the receptive field: Context stacks
- A context stack basically processes a longer part of the audio signal and locally conditions the model on that part
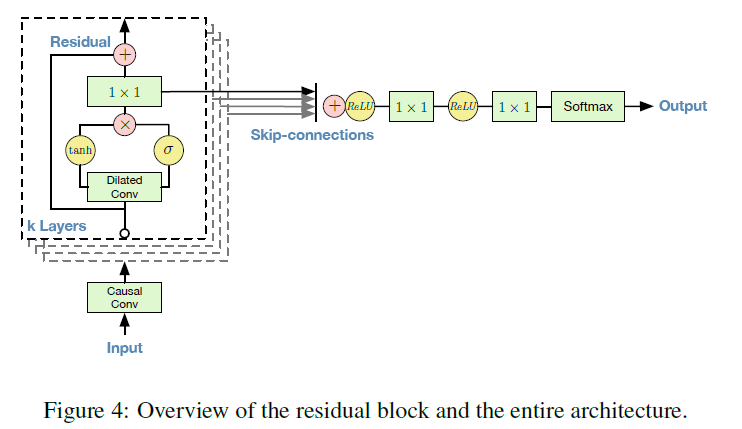
Network
The intuition behind this configuration is two-fold.
- First, exponentially increasing the dilation factor results in exponential receptive field growth with depth. A 1, 2, 4, …, 512 block can be seen as a 1x1024 conv with receptive field of size 1024
- Second, stacking these blocks further increases the model capacity and the receptive field size.


Implementation
- At training time, the conditional predictions for all timesteps can be made in parallel because all timesteps of ground truth x are known. Which means the original sample are segmented into fragment using sliding window, usually step or stride equals 1.
- At inference time, When generating with the model, the predictions are sequential: after each sample (timestep) is predicted, it is fed back into the network to predict the next sample.
x1class WaveNet(nn.Module):2 def __init__(self, num_channels, dilation_depth, num_repeat, kernel_size=2):3 super(WaveNet, self).__init__()4 # num_repeat represents number of stack, dilation_depth represents number of layers in each stack5 # input data length is normally greater than 2**(dilation_depth * num_repeat + dilation -1) 6 dilations = [2 ** d for d in range(dilation_depth)] * num_repeat7 internal_channels = int(num_channels * 2)8 # half of internal_channels represent W_f, another represents W_gate 9 self.hidden = _conv_stack(dilations, num_channels, internal_channels, kernel_size) 10 # linear injection for residual, with kernel size equals 1 without padding11 self.residuals = _conv_stack(dilations, num_channels, num_channels, 1)12 # input_layer is same as conv1d13 self.input_layer = CausalConv1d(14 in_channels=1,15 out_channels=num_channels,16 kernel_size=1,17 )18 # in_channels represents concatenant of featuremaps of all layers, which equals dilation_depth * num_repeat, with num_channels in each layer19 # out_channel does regression/prediction20 self.linear_mix = nn.Conv1d(21 in_channels=num_channels * dilation_depth * num_repeat,22 out_channels=1,23 kernel_size=1,24 )25 self.num_channels = num_channels26
27 def forward(self, x):28 # out is used for cascade layer29 out = x30 # skips is used for regression/prediction31 skips = []32 # similar process as image process, does feature expanding, from 1 or 2 to num_channels33 out = self.input_layer(out)34 # output size is decided by stride and kernel size, not related with dilation35 for hidden, residual in zip(self.hidden, self.residuals):36 x = out37 out_hidden = hidden(x)38
39 # gated activation40 # split (32,16,3) into two (16,16,3) for tanh and sigm calculations41 out_hidden_split = torch.split(out_hidden, self.num_channels, dim=1)42 out = torch.tanh(out_hidden_split[0]) * torch.sigmoid(out_hidden_split[1])43
44 skips.append(out)45
46 out = residual(out)47 # Causal padding cretirion guarantees that x.size(2)=out.size(2), then [:, :, -out.size(2) :] = x48 out = out + x[:, :, -out.size(2) :] 49
50 # modified "postprocess" step:51 # s[:, :, -out.size(2) :] = s52 out = torch.cat([s[:, :, -out.size(2) :] for s in skips], dim=1)53 # 1*1, relu and softmax are not expressed here in the code, compared with original wavenet54 out = self.linear_mix(out)55 return out56 57# Causal convolution uses zero padding only on left side of the data, rather than “same” padding which pads both sides equally.58# Note: Zero-padding the data is used to control the output size of the convolutional layer by adding extra zero’s to a particular dimension.59
60class CausalConv1d(torch.nn.Conv1d):61 def __init__(self, in_channels, out_channels, kernel_size, stride=1, dilation=1, groups=1, bias=True):62 self.__padding = (kernel_size - 1) * dilation63
64
65 super(CausalConv1d, self).__init__(66 in_channels,67 out_channels,68 kernel_size=kernel_size,69 stride=stride,70 padding=self.__padding,71 dilation=dilation,72 groups=groups,73 bias=bias,74 )75
76
77 def forward(self, input):78 result = super(CausalConv1d, self).forward(input)79 if self.__padding != 0:80 return result[:, :, : -self.__padding]81 return result82 83# For example, for dilations=8 and num_repeat=2 , you get “1, 2, 4, 8, 16, 32, 64, 128, 1, 2, 4, 8, 16, 32, 64, 128”84
85# here, stride==1; 86# if kernel size=1 and padding=0, then output length=input length; 87# if kernel size=2, then padding=dilation, similarly, output length=input length; 88def _conv_stack(dilations, in_channels, out_channels, kernel_size):89 """90 Create stack of dilated convolutional layers, outlined in WaveNet paper:91 https://arxiv.org/pdf/1609.03499.pdf92 """93 return nn.ModuleList(94 [95 CausalConv1d(96 in_channels=in_channels,97 out_channels=out_channels,98 dilation=d,99 kernel_size=kernel_size,100 )101 for i, d in enumerate(dilations)102 ]103 )
Appendix
Text to Speech
语音合成是通过文字人工生成人类声音, 也可以说语音生成是给定一段文字去生成对应的人类读音。 这里声音是一个连续的模拟的信号。而合成过程是通过计算机, 数字信号去模拟。
Two stage text-to-speech systhsis:

text analysis文本分析
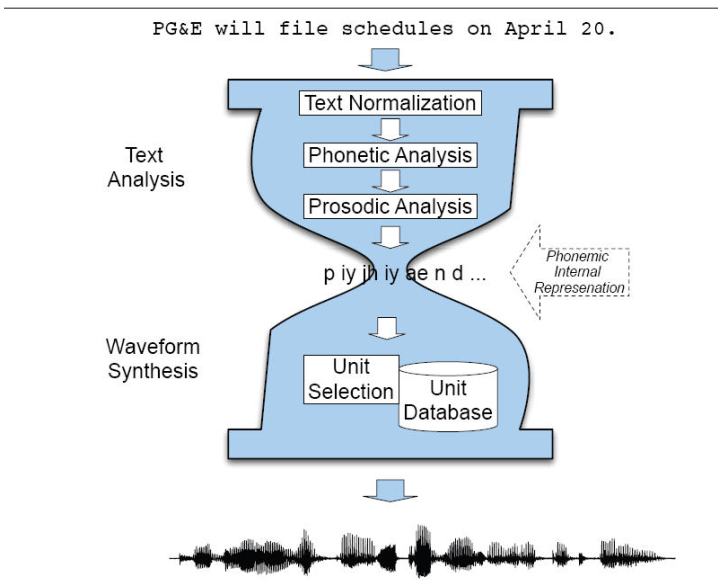
文本分析就是把文字转成类似音标的东西。 比如下图就是一个文本分析,用来分析 “PG&E will file schedules on April 20. ” 文本分析主要有四个步骤, 文字的规范化, 语音分析, 还有韵律分析。 下面一一道来。

文本规范化 (Text normalization )
文本分析首先是要确认单词和句子的结束。 空格会被用来当做隔词符. 句子的结束一般用标点符号来确定, 比如问号和感叹号 (?!), 但是句号有的时候要特别处理。 因为有些单词的缩写也包含句号, 比如 str. "My place on Main Str. is around the corner". 这些特别情况一般都会采取规则(rule)的方式过滤掉。
接下来 是把非文字信息变成对应的文字, 比如句子中里有日期, 电话号码, 或者其他阿拉伯数字和符号。 这里就举个例子, 比如, I was born April 14. 就要变成, I was born April fourteen. 这个过程其实非常繁琐,现实文字中充满了 缩写,比如CS, 拼写错误, 网络用语, tmr --> tomorrow. 解决方式还是主要依靠rule based method, 建立各种各样的判断关系来转变。
语音分析 (Phonetic analysis)
语音分析就是把每个单词中的发音单词标出来, 比如Fig. 3 中的P, 就对应p和iy, 作为发音。 这个时候也很容易发现,发音的音标和对应的字母 不是一一对应的关系,反而需要音标去对齐 (allignment)。 这个对齐问题很经典, 可以用很多机器学习的方法去解决, 比如Expectation–maximization algorithm.
韵律分析 (Prosody analysis)
韵律分析就是英语里的语音语调, 汉语中的抑扬顿挫。 我们还是以英语为例, 韵律分析主要包含了: 重音 (Accent),边界 (boundaries), 音长 (duration),主频率 (F0).
重音(Accent)就是指哪个音节发生重一点。 对于一个句子或者一个单词都有重音。 单词的重音一般都会标出来,英语语法里面有学过, 比如banana 这个单词, 第二个音节就是重音。 而对于句子而言,一样有的单词会重音,有的单词会发轻音。 一般有新内容的名词, 动词, 或者形容词会做重音处理。 比如下面的英语句子, surprise 就会被重音了, 而句子的重音点也会落到单词的重音上, 第二个音节rised, 就被重音啦。 英语的重音规则是一套英语语法,读者可以自行百度搜索。
I’m a little surprised to hear it characterized as upbeat.
边界 (Boundaries) 就是用来判断声调的边界的。 一般都是一个短语结束后,有个语调的边界。 比如下面的句子, For language, 就有一个边界, 而I 后面也是一个边界.
For language, I , the author of the blog, like Chinese.
音长(Duration)就是每个音节的发声长度。 这个通俗易懂。 NLP 里可以假定每个音节单词长度相同都是 100ms, 或者根据英语语法, 动词, 形容词之类的去确定。 也可以通过大量的数据集去寻找规律。
主频率 (F0)就是声音的主频率。 应该说做傅里叶转换后, 值 (magnitude) 最大的那个。 也是人耳听到声音认定的频率。一个成年人的声音主频率在 100-300Hz 之间。 这个值可以用 线性回归来预测, 机器学习的方法预测也可以。一般会认为,人的声音频率是连续变化的,而且一个短语说完频率是下降趋势。
文本分析就介绍完了,这个方向比较偏语言学, 传统上是语言学家的研究方向,但是随着人工智能的兴起,这些feature 已经不用人为设计了,可以用端到端学习的方法来解决。 比如谷歌的文章 TACOTRON: TOWARDS END-TO-END SPEECH SYNTHESIS 就解救了我们。
Waveform synthesis声波生成
这里说所谓的waveform synthesis 就是用这些 语言特征值(text features)去生成对应的声波,也就是生成前文所说的采样频率 和 振幅大小(对应的数字信号)。 这里面主要有两个算法。
串接合成(concatenative speech synthesis): 这个方法呢, 就是把记录下来的音节拼在一起来组成一句话,在通过调整语音语调让它听起来自然些。 比较有名的有双音节拼接(Diphone Synthesis) 和单音节拼接(Unit Selection Synthesis)。这个方法比较繁琐, 需要对音节进行对齐(alignment), 调整音节的长短之类的。
参数合成 (Parametric Synthesis): 这个方法呢, 需要的内存比较小,是通过统计的方法来生成对应的声音。 模型一般有隐马尔科夫模型 (HMM),还有最近提出的神经网络算法Wavenet, WaveRNN.
对于神经网络的算法来说, 一般都是生成256 个 quantized values 基于softmax 的分类器, 对应 声音的 256 个量化值。 WaveRNN 和wavenet 就是用这种方法生成的。